
The five tools a starter actually asks for
Sourdough gathers equipment fast. Ask anyone six months in and they will show you a shelf of it. But the culture itself — the thing you feed twice a day and that decides whether the loaf works — needs remarkably little, and confusing the two is how people end up with a full drawer and a starter they still cannot read.
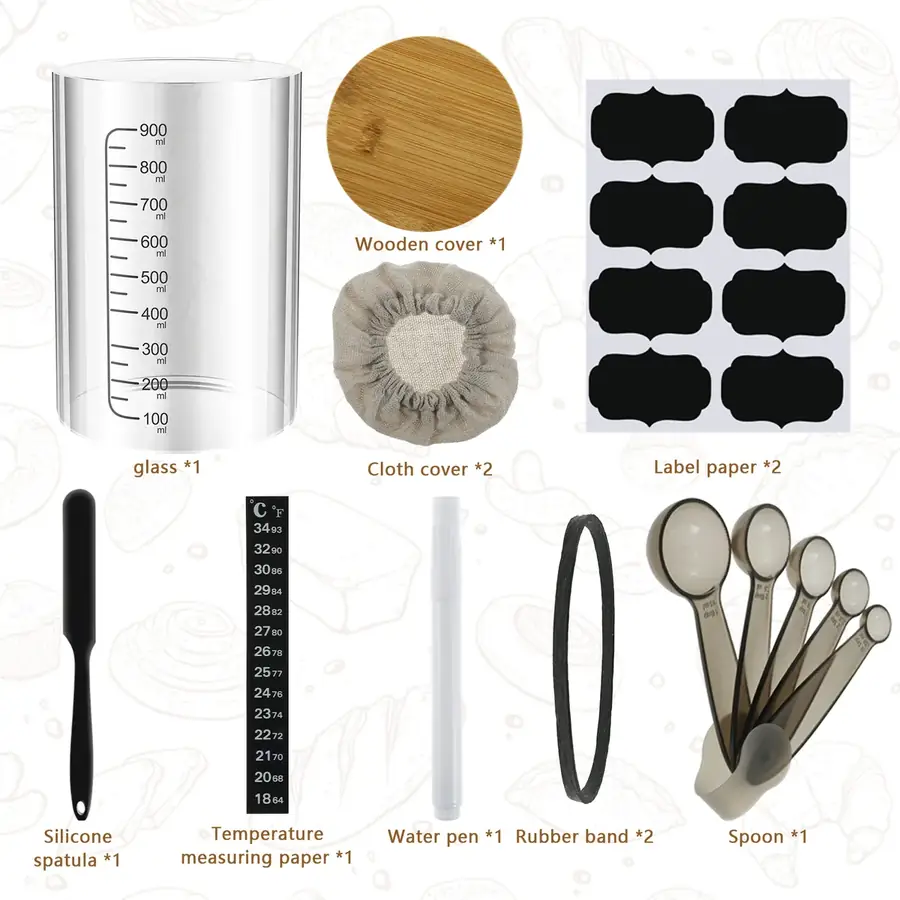
Tool 1 — a jar you can read
The container is the instrument. A 900 ml jar printed from 100 to 900 ml turns every observation into a number: the starter went from 200 to 400, so it doubled. Without a scale you are comparing heights, and heights mislead — a rise from 400 to 500 covers more glass than one from 100 to 200, yet the second one doubled and the first barely moved.
Straight walls matter as much as the scale. They let a spatula take the whole side down in one pass, so the glass stays clear and the printing stays legible. And the wide mouth, 3.9 in across, is what makes that quick enough to do every single time rather than when you remember.
Tool 2 — a temperature strip
Fermentation speed tracks temperature closely, and the temperature that counts is the one inside the jar, not the one on the wall thermostat. A strip reading 64 to 93 °F on the side of the glass covers a cold winter counter through to a warm proofing spot.
This is the tool that answers the most common question in sourdough, which is some version of "why is nothing happening". Below about 68 °F everything slows right down and a perfectly healthy culture looks inert. Reading the number turns a worry into a decision: move the jar somewhere warmer, or simply wait longer.
Tool 3 — a band to mark the level
Slide the elastic band to the surface right after feeding. Whatever happens next is measured against a mark you set yourself, so the rise is a fact rather than an impression. It also catches the case nothing else does: if you come back and the level sits below the band, the starter rose and fell while you were out — it did not fail, you simply missed the peak.
The band doubles as the fastening for the cloth cover, which is the airflow option when the culture is at its most active.
Tool 4 — a spatula that reaches
9.48 in of flexible silicone, thin enough to get into the bottom corners. Scraping down at each feed is the single habit that keeps the jar clear, and a clear jar is the whole point of the exercise. Skip it for a week and you are reading your starter through a film of dried flour.
Tool 5 — labels and a pen
A sheet of eight chalk labels and an erasable pen. Write the date and the feeding ratio on the jar itself, wipe it and write again. It seems like the least necessary item in the box right up until the first morning you cannot remember whether you fed it yesterday or the day before.
How the five work together in a single minute
Individually each tool looks almost trivial. What makes them worth owning as a set is that they collapse the whole routine into about sixty seconds, twice a day, with no thinking required.
You lift the lid and read the level off the scale — that is the rise since the last feed, as a number. You glance at the strip and read the temperature, which tells you whether a slow morning is a cold morning. You pour off what you are discarding, add flour and water, and take the spatula once around the wall so the glass stays clear. You slide the band down to the new surface level. You wipe the label and write today's date. Lid back on, loose.
That is the entire loop, and nothing in it requires a scale, a notebook, a phone or a timer. The information lives on the jar, which means it is still there tomorrow whether or not you remembered to write anything down. Habits survive on how little they cost, and this one costs a minute.
What each tool tells you that the others cannot
It is worth being precise about why five, rather than three or eight, because each one answers a question the others leave open.
| Tool | The question it answers | What you cannot know without it |
|---|---|---|
| Graduated jar | How far did it rise? | Whether it doubled, or merely moved |
| Temperature strip | How warm is it sitting? | Whether a slow rise is cold or unwell |
| Elastic band | Where did it start? | Whether it peaked and fell while you were out |
| Spatula | — | The glass films over and the scale stops being readable |
| Labels & pen | When did I last feed it? | Whether you are on schedule or a day behind |
Read across that table and a pattern shows up: four of the five exist to turn something invisible into something you can see. That is what separates a starter you understand from one you are simply hoping about, and it is why the kit is built around the jar rather than around the bread.
What comes in each set
| Item | Essential Set | Complete Set |
|---|---|---|
| 900 ml graduated glass jar | 1 | 1 |
| Wooden lid | 1 | 1 |
| Silicone spatula | 1 | 1 |
| Stick-on thermometer strip | 1 | 1 |
| Erasable marker pen | 1 | 1 |
| Breathable cloth cover | 1 | 2 |
| Elastic band | 1 | 2 |
| Sheet of 8 chalk labels | 1 | 2 |
| Measuring spoons (5-piece) | — | 1 set |
The Complete Set doubles the consumables — cover, band and label sheet — and adds the five-piece measuring spoons. If you feed by volume rather than by weight, the spoons live with the jar instead of in another drawer, which removes one more small friction from a twice-daily habit.
Numbers worth knowing
jar capacity, graduated in 100 ml steps, 3.9 in across and 5.9 in tall
— Technical sheet, 2026
the range covered by the stick-on temperature strip, which spans a cold counter through to a warm proofing spot
— Technical sheet, 2026
starters sequenced across four continents in the largest survey of sourdough microbiomes to date — the variation between healthy starters is far wider than folklore suggests
— Landis et al., eLife, 2021
Where to go next
The main product page covers the jar in detail, and the starter kit page compares the two sets side by side. On materials, why glass explains the choice, and the fermentation jar page looks at the vessel itself. For the routine: feeding, storing and cleaning. Starting out? Making a starter covers the first two weeks. You can also read what buyers reported or see our standards.
Questions about sourdough tools
What tools do I need to keep a sourdough starter?
Five: a jar with room to double, a way to read the level, a way to read the temperature, something to mark your starting point, and something to scrape the walls with. Our kit is built around exactly those five, which is why it fits in one box and costs what it does.
Do I need a scale?
It helps once you start baking, because bread recipes work in ratios. For keeping a starter alive, the printed scale on the jar does the job — you read the rise straight off the glass, which is the measurement that actually tells you how the culture is doing.
What is the spatula for?
Scraping the walls down at every feed. It sounds minor and it is the difference between a jar that stays clear for weeks and one that needs soaking. At 9.48 in it reaches the bottom corners of the 900 ml jar in a single pass.
Are the chalk labels reusable?
Yes. They come with an erasable pen, so you write the date and feeding ratio, wipe it off and write again. A sheet of eight comes in the Essential Set and two sheets in the Complete Set.